Published on 2026/02/14
Recently, I’ve been working on more and more complex web applications and one common component that many of these would benefit from is a nice text/code editor. To not overcomplicate my life, for now I’ve always just used simple (and sad) textareas without any advanced features. But I think I’ve now reached the point that I want to have better code editing features like syntax highlighting, multiple cursors and more.
From what I’ve seen, most LLMs today just suggest to use Monaco, which is a great editor, but is also very heavy and not easily customizable (from my experiments). I’d like to have more control over the editor itself to extend it in various ways, for example by adding custom decorations or other features that are not easily achievable with Monaco and this is why I decided to give CodeMirror 6 a try, which is a more modular and customizable editor library.
Nowadays, with the rise of LLMs, I think that having a good code editor with a review mode that allows users to easily accept or reject changes is becoming increasingly important as the chat interface model isn’t always ideal and I prefer having the LLMs update a document directly by regenerating it completely or with tool-based editing.
In both cases, users need to see the changes between the old and the new version of the document and be able to accept/reject each one. For my use cases, this is currently the most intuitive and precise way to handle external changes while editing both code or prose. So in this article, we will explore how to build a simple code review extension for CodeMirror 6 using the unified merge extension.
Various text editor options
You can skip this section if you want but just for the sake of completeness let’s quickly go through some of the options available for text editors on the web. This is not an exhaustive list, but it should give you an idea of the landscape and the trade-offs between different options.
Just a textarea™
This is the last trademarked thing in this post and the simplest option available on the web, this doesn’t require any external libraries, copy-paste and undo/redo work out of the box. This is easy to set up and one can easily add features like auto-resize.
Autoresizing
The only feature I generally add is vertical auto-resizing, I do the following
textarea {
    /* To keep the whole textarea
       in the viewport */
    max-height: 75vh;

    resize: none;

    /* Disable wrapping, nice for
       code editing and this is
       a must for this technique */
    white-space: pre;
    overflow-wrap: normal;
    overflow-x: scroll;
}<textarea
value={content}
onInput={e => setContent(e.currentTarget.value)}
rows={Math.max(3, content.split('\n').length)}
/>This article is written using MDX and has meny interactive examples, here is how the auto-resize textarea looks like in practice:
Another technique is to use the vertical scroll height of the <textarea>, this works even without word wrapping but can be a bit janky due to the layout shifts caused by the height changes (this happens on Chrome but not on Safari from my testing)
function autoResizeTextarea(textarea: HTMLTextAreaElement) {
    textarea.style.height = 'auto'
    textarea.style.height = `${textarea.scrollHeight}px`
}
HTML Datalists
If you only need a single input field with autocomplete, let’s always remember that HTML has the native <datalist> element that can be used to provide suggestions for an <input> or <textarea> element.
Without too much work this can be used as a very nice base for the common “tags input” or “multi select” component, keep a input with a datalist with the already available tags and when the user presses enter, add the current value to the list of selected tags and clear the input.
Other editor libraries
Now let’s talk about the main libraries available
-
Ace — A popular embeddable code editor that’s been around since 2010. It supports syntax highlighting for over 100 languages, has automatic indent and outdent, configurable keyboard shortcuts, and features like code folding and multiple cursors. Ace has been used in Cloud9 IDE, GitHub, and many other platforms. It’s a solid choice for general-purpose code editing, though its API can feel a bit dated compared to newer alternatives.
-
Monaco — This is the editor that powers VS Code, built by Microsoft. It’s the most feature-complete option available, offering IntelliSense, rich semantic and hover information out of the box. Monaco has excellent TypeScript support and can work with the Language Server Protocol. The main drawback is its size—the bundle is quite large, which can impact page load times. It’s best suited for complex development environments where you need IDE-like features.
-
CodeMirror 5 — The old version of CodeMirror is a widely used code editor library with a large ecosystem of plugins and extensions. It’s mature, stable, and well-documented. However, its architecture shows its age; the codebase grew organically over many years, making it harder to customize deeply or reason about performance. Version 5.x is still maintained but not actively developed, as the focus has shifted to CodeMirror 6.
A notable mention is CodeJar, a lightweight editor library that uses “the overlay trick” to support syntax highlighting and uses a contenteditable element for input and reimplements editor behavior from scratch. It is very easy to set up and you can also provide syntax highlighting through Prism.js, Highlight.js, or a custom user-provided function.
Most text editor libraries grew organically over time, adding features and complexity in an ad-hoc manner.
Codemirror 6
CodeMirror 6 is the latest iteration of the CodeMirror project, a complete rewrite that was designed from scratch with a modular architecture in mind that separates state management from view rendering.
CodeMirror already provides an extension called codemirror/merge that offers side-by-side and unified diff views, making it well-suited for this use case. In this article, we’ll explore the basics of CodeMirror 6 and how to leverage the merge extension to build a simple editor with a review mode for managing changes after an external update.
The only problem I have with CodeMirror 6 is that the documentation is very sparse, there are many examples but they are not very detailed and don’t explain the core concepts of the library.
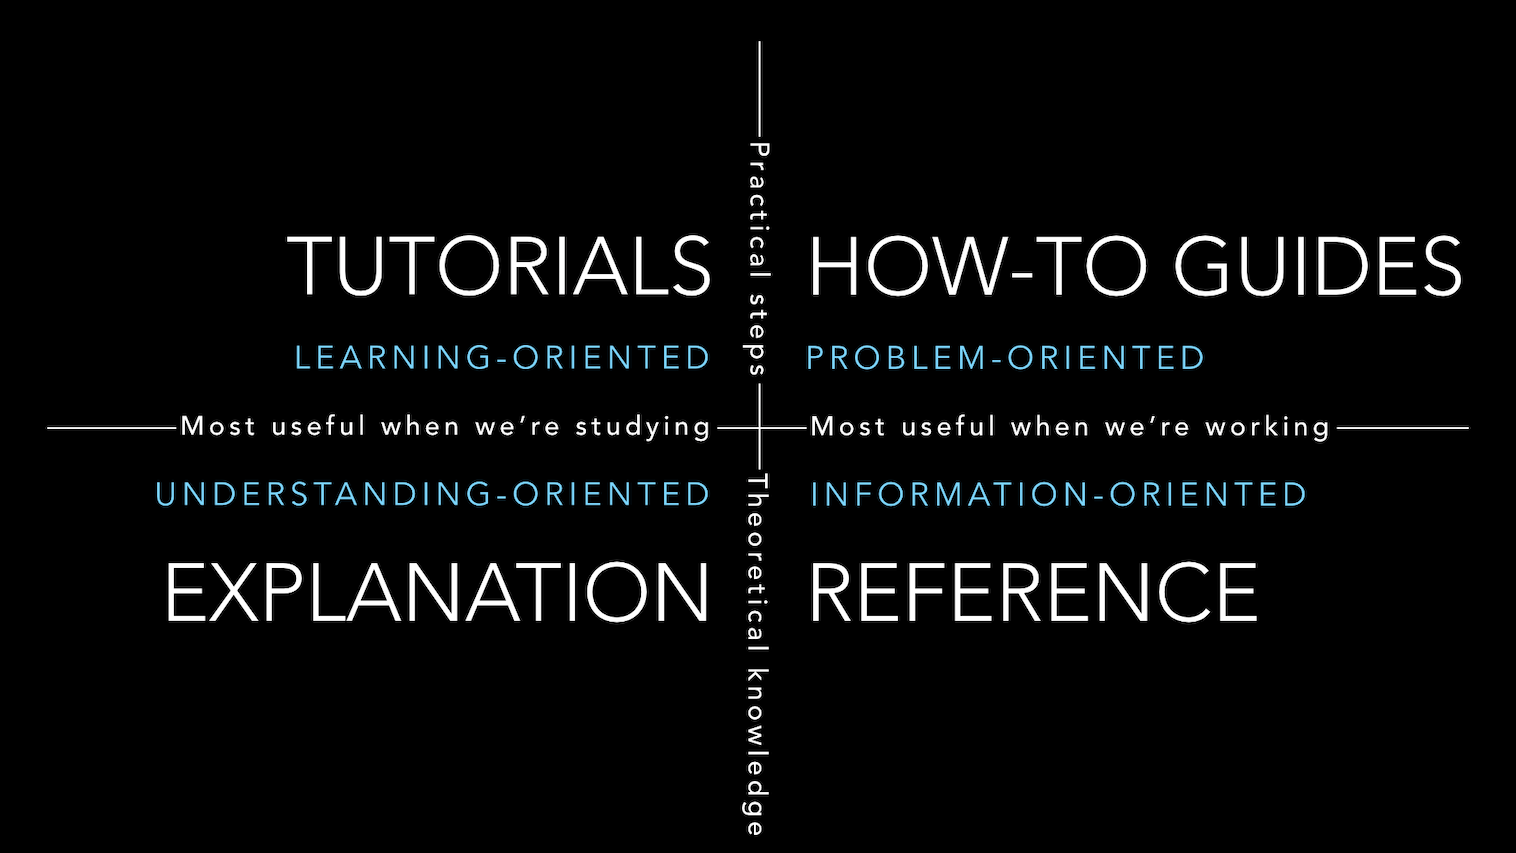
In terms of the four documentation quadrants, CodeMirror 6 has a lot of how-to and reference material and an extensive system guide that explains the core concepts, but it lacks good tutorials that incrementally introduce concepts and features in a practical way. This was one of the hardest things for me while learning it, and I hope this article can be a good starting point for anyone interested in using CodeMirror 6 for their projects.
By the way, I also tried to ask Claude and some other models to write this extension for me, but they all failed to produce a working implementation. I think the functional architecture of CodeMirror 6 is not very intuitive for them, and being a niche library with sparse documentation doesn’t help either.
Technically I haven’t tried more advanced techniques like giving models the complete source code as a reference before writing the extension, but I still wanted to give learning the library I try so I didn’t do that.
Basic setup
As most text editor libraries, CodeMirror (from now on I will omit the 6) can be used with a very simple setup. Just provide a DOM element to mount the editor onto and give it some initial content. Here is a minimal example from the official documentation:
import { basicSetup } from 'codemirror'
import { EditorView } from '@codemirror/view'

const view = new EditorView({
    parent: document.body,
    doc: 'Start document',
    extensions: [basicSetup],
})
This code is correct but this is already lying a bit about the real architecture of CodeMirror, but we’ll get to this later. Differently from other editors, accessing and modifying the content of the editor is more involved than just reading or writing a .value property.
To get the current content of the editor, you can use view.state.doc.toString(). To modify it programmatically, you need to dispatch a transaction with all the changes you want to apply. Here a change is a range of text to replace and the new text to insert in its place.
More precisely we don’t replace the content with a new string but a new document, this is the representation used internally by CodeMirror for the content of the editor, it has some optimizations for large documents, but you can just think of it as a string for now. Also most places that expect a Text will also accept a string and convert it for you. Here is an example of replacing all the content of the editor:
// Get current content
console.log(view.state.doc.toString())

...

// Replace all content
view.dispatch({
    changes: {
        from: 0,
        to: view.state.doc.length,
        insert: 'New content'
    },
})
Let’s get back to the lie from before, the doc and extensions parameters are actually just shorthands for creating an initial state for you, here is a more explicit way to write the same code as above:
import { EditorState } from '@codemirror/state'
import { EditorView, basicSetup } from '@codemirror/view'

const state = EditorState.create({
    doc: 'Start document',
    extensions: [basicSetup],
})

const view = new EditorView({
    parent: document.body,
    state,
})
The first thing to note here is that state objects are immutable, you cannot modify them directly. On the other hand, state objects have utility methods to create new transaction objects (also immutable) that represent changes to themselves. You can then dispatch these transactions to an EditorView to apply the changes. This is a very much functional-inspired way to manage the state of the editor, but it can be a bit overwhelming at first. This follows very closely the functional core, imperative shell architecture.
To recap, the core concepts of CodeMirror 6 are:
-
State — The state is an immutable object that represents the current document, including its content, selection, metadata and extensions. It is the single source of truth for the editor and can only be updated by applying transactions to the view that manages it.
-
CodeMirror allows multiple cursors (and selections), they are represented as an array of from-to ranges of the content. One of them is the “main” selection and is synchronized with the DOM one.
-
Extensions are also part of the state and are the main way to customize the behavior of the editor. They can be passed multiple times and they will be merged together or deduplicated using various strategies.
-
-
View — The view is responsible for rendering the editor in the DOM and handling user interactions. It processes transactions dispatched to it and updates the view accordingly.
-
Commands are functions that perform specific actions in the editor, such as inserting text, deleting text, or moving the cursor. They can be triggered by user input (like keyboard shortcuts) or programmatically.
These are separated at the module level as well, with the @codemirror/state, @codemirror/view, and @codemirror/commands packages.
Another important concept is that of Facets. They are the main way CodeMirror lets extensions interact with each other and with the editor. Here are some examples from the documentation:
The idea behind facets is that most types of extension points allow multiple inputs, but want to compute some coherent combined value from those. How that combining works may differ.
- For something like tab size, you need a single output value. So that facet takes the value with the highest precedence and uses that.
- When providing event handlers, you want the handlers as an array, sorted by precedence, so that you can try them one at a time until one of them handles the event.
- Another common pattern is to compute the logical or of the input values (as in allowMultipleSelections) or reduce them in some other way (say, taking the maximum of the requested undo history depths).
It’s still not completely clear to me how facets work behind the scenes, what I got is that they are the thing that is cached and recomputed only when the relevant inputs of a facet change (i.e. signals, but like React useEffect they take an explicit dependency array). So they are the “nodes” in the DAG of cached computations that CodeMirror uses to optimize the computations needed to update the view of the editor.
In a given configuration, most facets tend to be static, provided only directly as part of the configuration. But it is also possible to have facet values computed from other aspects of the state.
let info = Facet.define<string>()
...
extensions: [
    info.of('hello'),
    info.compute(['doc'], state => `lines: ${state.doc.lines}`),
],
...
console.log(state.facet(info))
// ["hello", "lines: 2"]
[…] facet values are only recomputed when necessary, so you can use an object or array identity test to cheaply check whether a facet changed.
The Unified Merge Extension
Here is a basic example of how to setup a simple editor with the unified merge extension:
import { EditorState, EditorView, basicSetup } from 'codemirror'
import { unifiedMergeView } from '@codemirror/merge'

const view = new EditorView({
    parent: document.body,
    doc: 'one\ntwo\nthree\nfour',
    extensions: [
        basicSetup,
        unifiedMergeView({
            original: 'one\n2\nthree\n4',
            allowInlineDiffs: true,
        }),
    ],
})
By default this view shows the diff between the “current” content and an “original” provided content. All new changes are made to the “current” content, so to update the diff you just need to dispatch updates as always and the diff view will update accordingly.
Let’s now add a simple regex find and replace tool. We can create a method that takes the current state of the editor (an EditorState object) and the two find and replace strings, and returns an array of ChangeSpec.
function findReplaceTransaction(state, findText, replaceText) {
    const changes = []
    const regex = new RegExp(findText, 'g')

    const docStr = state.doc.toString()
    for (const match of docStr.matchAll(regex)) {
        changes.push({
            from: match.index,
            to: match.index + match[0].length,
            insert: replaceText,
        })
    }

    return changes
}

...

view.dispatch({
    changes: findReplaceTransaction(view.state, findText, replaceText)
})
Try to use the find and replace tool and change “o” to “O”
This works fine as a diff editor, but I would like to make this more like the VSCode code review interface. After no changes are left in the diff view, I want to disable the diff view so that the user can continue editing the document as normal without the diff view in the way. This is not the default behavior of the merge view, but we can achieve this by conditionally enabling and disabling the unifiedDiff extension.
For now let’s start from the problem of detecting when the user accepts or rejects a change in the merge view, and then we will use this information to disable it when there are no more changes to review.
Intercepting accept/reject events
This can be achieved using an EditorView.updateListener extension that listens for transactions with the accept or revert user events which are emitted by the unified merge view. This was one of the things that wasn’t documented in the merge view documentation (I found this out by giving Gemini the whole @codemirror/merge repo and asking it how to detect this, this was very helpful).
EditorView.updateListener.of(update => {
    const tr = update.transactions.find(
        tr => tr.isUserEvent('accept') || tr.isUserEvent('revert'),
    )

    if (tr) {
        const remainingChunks = getChunks(update.state)?.chunks.length
        const eventType = tr.isUserEvent('accept') ? 'accepted' : 'reverted'

        console.log(`Chunk ${eventType}! ${remainingChunks} remaining.`)
    }
})
The getChunks() function from @codemirror/merge takes the current editor state and returns the current diff chunks, allowing us to determine how many changes are left to review.
This will show a toast message when a chunk is accepted or reverted.
Compartments
The next step is to enable or disable the unified diff view based on the current state of the editor. We can achieve this by conditionally applying the unifiedDiff extension using compartments, which allow us to “reconfigure” parts of the editor configuration dynamically.
We can create a new “extension type” for this compartment as follows:
export const unifiedDiffCompartment = new Compartment()Then we can instanciate this as unifiedDiffCompartment.of([]) in the initial editor configuration, and later reconfigure it to enable the unified diff view when needed:
view.dispatch({
    effects: unifiedDiffCompartment.reconfigure(
        enabled ? [unifiedMergeView(...)] : []
    ),
})
You can use the button above to toggle the unified diff view on and off, the original document is always the original one.
Let’s put it all together
We can now create a final editor that has all this pieces together. After some trial and error, I found that the best way to implement this is to trigger the review mode with a custom user event that I called review-changes. The “original document” of the merge view should update only when first entering this review mode.
To solve this we can use a state field and a state effect to store and update the original document when first entering the review mode
const setOriginalDoc = StateEffect.define<Text | null>()

const originalDocField = StateField.define<Text | null>({
    create() {
        return null
    },
    update(value, tr) {
        for (const effect of tr.effects)
            if (effect.is(setOriginalDoc)) return effect.value

        return value
    },
})
To handle the review mode logic, we can use a “transaction extender” that intercepts transactions and manipulates them before they are applied.
-
When a transaction has the
review-changesuser event, we need to enable the review mode by reconfiguring the unified diff compartment to enable that extension. -
When we are in review mode and we apply the last change, we need to exit review mode and reconfigure again to disable that extension.
Here is the extension that implements this logic:
EditorState.transactionExtender.of(tr => {
    if (tr.isUserEvent('review-changes')) {
        const originalDoc = tr.startState.field(originalDocField)
        const reviewDoc = originalDoc ?? tr.startState.doc

        return {
            effects: [
                unifiedDiffCompartment.reconfigure([
                    unifiedMergeView({
                        original: reviewDoc,
                        allowInlineDiffs: true,
                    }),
                ]),
                ...(originalDoc ? [] : [setOriginalDoc.of(reviewDoc)]),
            ],
        }
    }

    if (tr.isUserEvent('accept') || tr.isUserEvent('revert')) {
        if (getChunks(tr.state)?.chunks.length === 0) {
            return {
                effects: [
                    setOriginalDoc.of(null),
                    unifiedDiffCompartment.reconfigure([]),
                ],
            }
        }
    }

    return null
})
For sake of completeness, here is how the find and replace tool triggers the review mode
view.dispatch({
    changes: findReplaceTransaction(view.state, findText, replaceText),
    userEvent: 'review-changes',
})
And this is the final result, you can try to enter the review mode, accept or reject changes and see how the diff view is toggled accordingly.
The final result, try to enter the review mode by replacing “2” with “two” and “4” with “four”, then accept or reject the changes and see how the diff view is toggled accordingly. (You can tell teh diff view is being toggled correctly by the slight change in the gutter on the left)
If you want to see the full code for this example, you can check the appendix where I put a self-contained version of this review mode extension that you can copy-paste into your project and modify as needed.
The complete code is just ~60 lines of code so I don’t think it’s worth creating a “micro-library” out of it, I think you are better off just putting that code into your project and modify it as needed, you are also free to make this a llm skill or something if you want.
Conclusion and Future Experiments
This post is already getting quite long, so I will just briefly mention some other experiments I’m working on I might write about in future posts, including some sneak peeks:
-
Custom Decorations — CodeMirror 6 has a very powerful system for creating custom decorations and I’m a great fan of WYSIWYG editors and “replacement decorations” are one of the starting points for those as featured in prosemirror-math
This editor has a custom svg shapes plugin that renders inline shapes in angle brackets
This is a simple example of a custom decoration that replaces
<shape color>with an svg element. This is already pretty cool, but I think this can be taken to even crazier levels, like having a “statefull” document with data structures that are rendered in a custom way and can be interacted with… -
Lezer — As if that wasn’t enough, CodeMirror 6 also has its own (incremental) parsing system called Lezer that allows us to create custom parsers for our languages and use them in the editor to get syntax highlighting, indentation, and other features…
-
LSP Integration — Lastly, I want to do some experiments with the Language Server Protocol (LSP) extension (maybe by first trying to build a simple LSP client with an autocomplete action that suggests variations of the current word near the cursor, for example let’s say we want to suggest the current word converted various cases like camelCase, snake_case, kebab-case…)
Another thing I want to experiment with is compiling some LSP servers to WASM and have them run directly in the browser…
References
-
https://codemirror.net/docs/ — The CodeMirror documentation
-
https://codemirror.net/docs/guide/ — The CodeMirror system guide
-
https://github.com/codemirror/merge — Repo of the original merge extension
-
https://marijnhaverbeke.nl/blog/extensibility.html — A blog post by the creator of codemirror about the early design decisions and its extensibility model
-
https://marijnhaverbeke.nl/blog/facets.html — A more up to date post about facets
Appendix
Let me copy-paste a snippet
Here’s a self-contained version of the code for the review tool extension. You can just copy-paste this “micro-library” into your project and let LLMs modify it as needed.
import { EditorView } from '@codemirror/view'
import {
    Compartment,
    EditorState,
    StateEffect,
    StateField,
    Text,
    type ChangeSpec,
    type TransactionSpec,
} from '@codemirror/state'

import { basicSetup } from 'codemirror'
import { getChunks, unifiedMergeView } from '@codemirror/merge'

const unifiedDiffCompartment = new Compartment()

const setOriginalDoc = StateEffect.define<Text | null>()

const originalDocField = StateField.define<Text | null>({
    create() {
        return null
    },
    update(value, tr) {
        for (const effect of tr.effects)
            if (effect.is(setOriginalDoc)) return effect.value

        return value
    },
})

const reviewModeExtension = EditorState.transactionExtender.of(tr => {
    // Enter review mode: enable diff and set original document if not set
    if (tr.isUserEvent('review-changes')) {
        const originalDoc = tr.startState.field(originalDocField)
        const reviewDoc = originalDoc ?? tr.startState.doc

        const effects = [
            unifiedDiffCompartment.reconfigure([
                unifiedMergeView({
                    original: reviewDoc,
                    allowInlineDiffs: true,
                }),
            ]),
        ]

        if (!originalDoc) {
            effects.push(setOriginalDoc.of(reviewDoc))
        }

        return { effects }
    }

    // Exiting review mode: disable diff view when all changes are resolved
    if (tr.isUserEvent('accept') || tr.isUserEvent('revert')) {
        if (getChunks(tr.state)?.chunks.length === 0) {
            return {
                effects: [
                    setOriginalDoc.of(null),
                    unifiedDiffCompartment.reconfigure([]),
                ],
            }
        }
    }

    return null
})

export const reviewExtension = [
    originalDocField,
    unifiedDiffCompartment.of([]),
    reviewModeExtension,
]

export function createReviewTransaction(
    changes: ChangeSpec[],
): TransactionSpec {
    return {
        changes,
        userEvent: 'review-changes',
    }
}
This can then be used in your editor setup as follows:
import { EditorState } from '@codemirror/state'
import { EditorView, basicSetup } from '@codemirror/view'

import { reviewExtension, createReviewTransaction } from './review-extension'

const view = new EditorView({
    parent: document.body,
    doc: 'one\n2\nthree\n4',
    extensions: [basicSetup, reviewExtension],
})

...

view.dispatch(
    createReviewTransaction([
        { from:  4, to:  5, insert:  'two' },
        { from: 10, to: 11, insert: 'four' },
    ]),
)
Unified Merge View Demo
A random demo of the unified merge view with the original document on the left and the new document on the right. The “recreate” button will recreate the unified merge view with those documents, you can also try to edit the unified view itself and see how the changes are reflected in the diff view.
The “overlay trick”
The “overlay trick” is a technique used to create a syntax-highlighted code editor using an hidden native input element (like a textarea or a contenteditable div) for handling user input and a visible “overlay” element that renders the highlighted code. The overlay is positioned on top of the input element and is updated in real-time as the user types, giving the illusion of a syntax-highlighted editor while still leveraging the native text input capabilities of the browser. This hack works best when the rendered code in the overlay has the same layout as the text in the input element below to ensure that the cursor and selection are properly aligned.
This technique already breaks down very easily, rich text editors for example often feature text with various font sizes, images, or other non-text content. Even just parts in bold or italic can cause the font layout to be different between the input and the overlay, causing the cursor to be misaligned.